Category: Recipes (Page 1 of 2)

Aloo Gobi (Cauliflower and Potato Bhaji)

Gather round children. I know that Indian food seems really scary. All those spices are intimidating to cook with. And if you don’t have them already, expensive to purchase. But since your local Indian buffet has shut down (remember those?), you’ve been wanting your fix. The good news is that Indian food is never as hard as it seems like it would be. Those expensive spices? You are buying them from the wrong store!

When buying spices, avoid Walmart. Avoid Kroger. Avoid any normal store you usually shop in. Get on the internet and find your local Asian or Indian grocery store. Buy the spices whole, not pre-ground (they are way better, but there are some exceptions). You can get a lot more spices for way cheaper if you do it this way. Store the leftover spices in whatever jars you have; remember how I said I’m partial to Talenti containers?

Rows and rows of Talenti ice cream containers filled with spices.
It’s called up-cycling. Someone from Talenti should sponsor me. I have a problem.

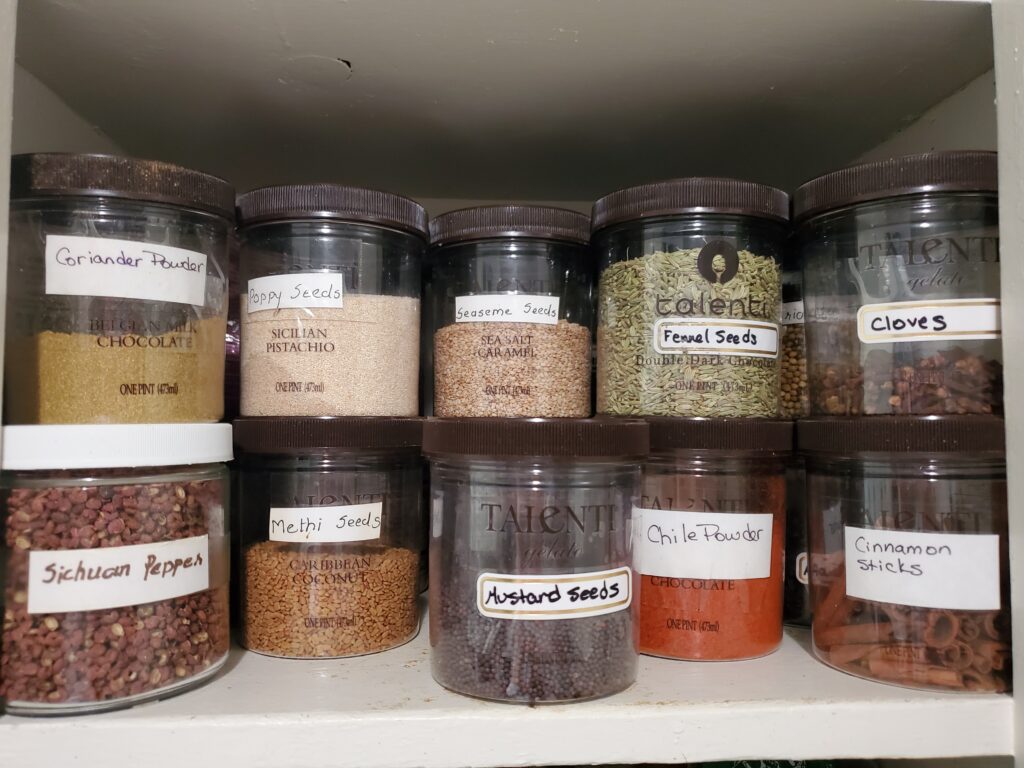
They really are the best. So. Your basic spices for any Indian food would be:

  • Chile Powder – preground
  • Haldi (Tumeric) – preground
  • Mustard Seeds
  • Cumin Seeds
  • Coriander Seeds

You probably already have cumin and coriander powder at home right? And some kind of chile powder? Cayenne perhaps? So that would leave you needing the turmeric and mustard seeds. Easy peasy!

While you’re at the store, grab some cinnamon sticks, cloves, anise, and cardamom. Find the loose black tea (we like Society, but Red Label is good too.) Snag you a strainer, making sure it’s a fine mesh.

Add some whole peppercorns, then order you a pepper grinder. You can’t beat freshly ground pepper. Finally, grab you a mortar and pestle. That’s it for the basics. Future recipes may call for other spices, but now you know where to go.

Before you leave, snag a head of cauliflower, some thai (bird chiles), cilantro, and ginger. Do you have tomatoes, onions, garlic, and potatoes at home already? If not, go ahead and grab them now. If you don’t feel like making your own naan, store-bought is fine, and actually really good. I am partial to Malaysian style puff paratha, so see if you can find those and give them a shot.

Alright, now we are home with our spices and our veggies. Are we ready to do this? I believe in you! You will be amazing at this! Let’s cook some vegetables!
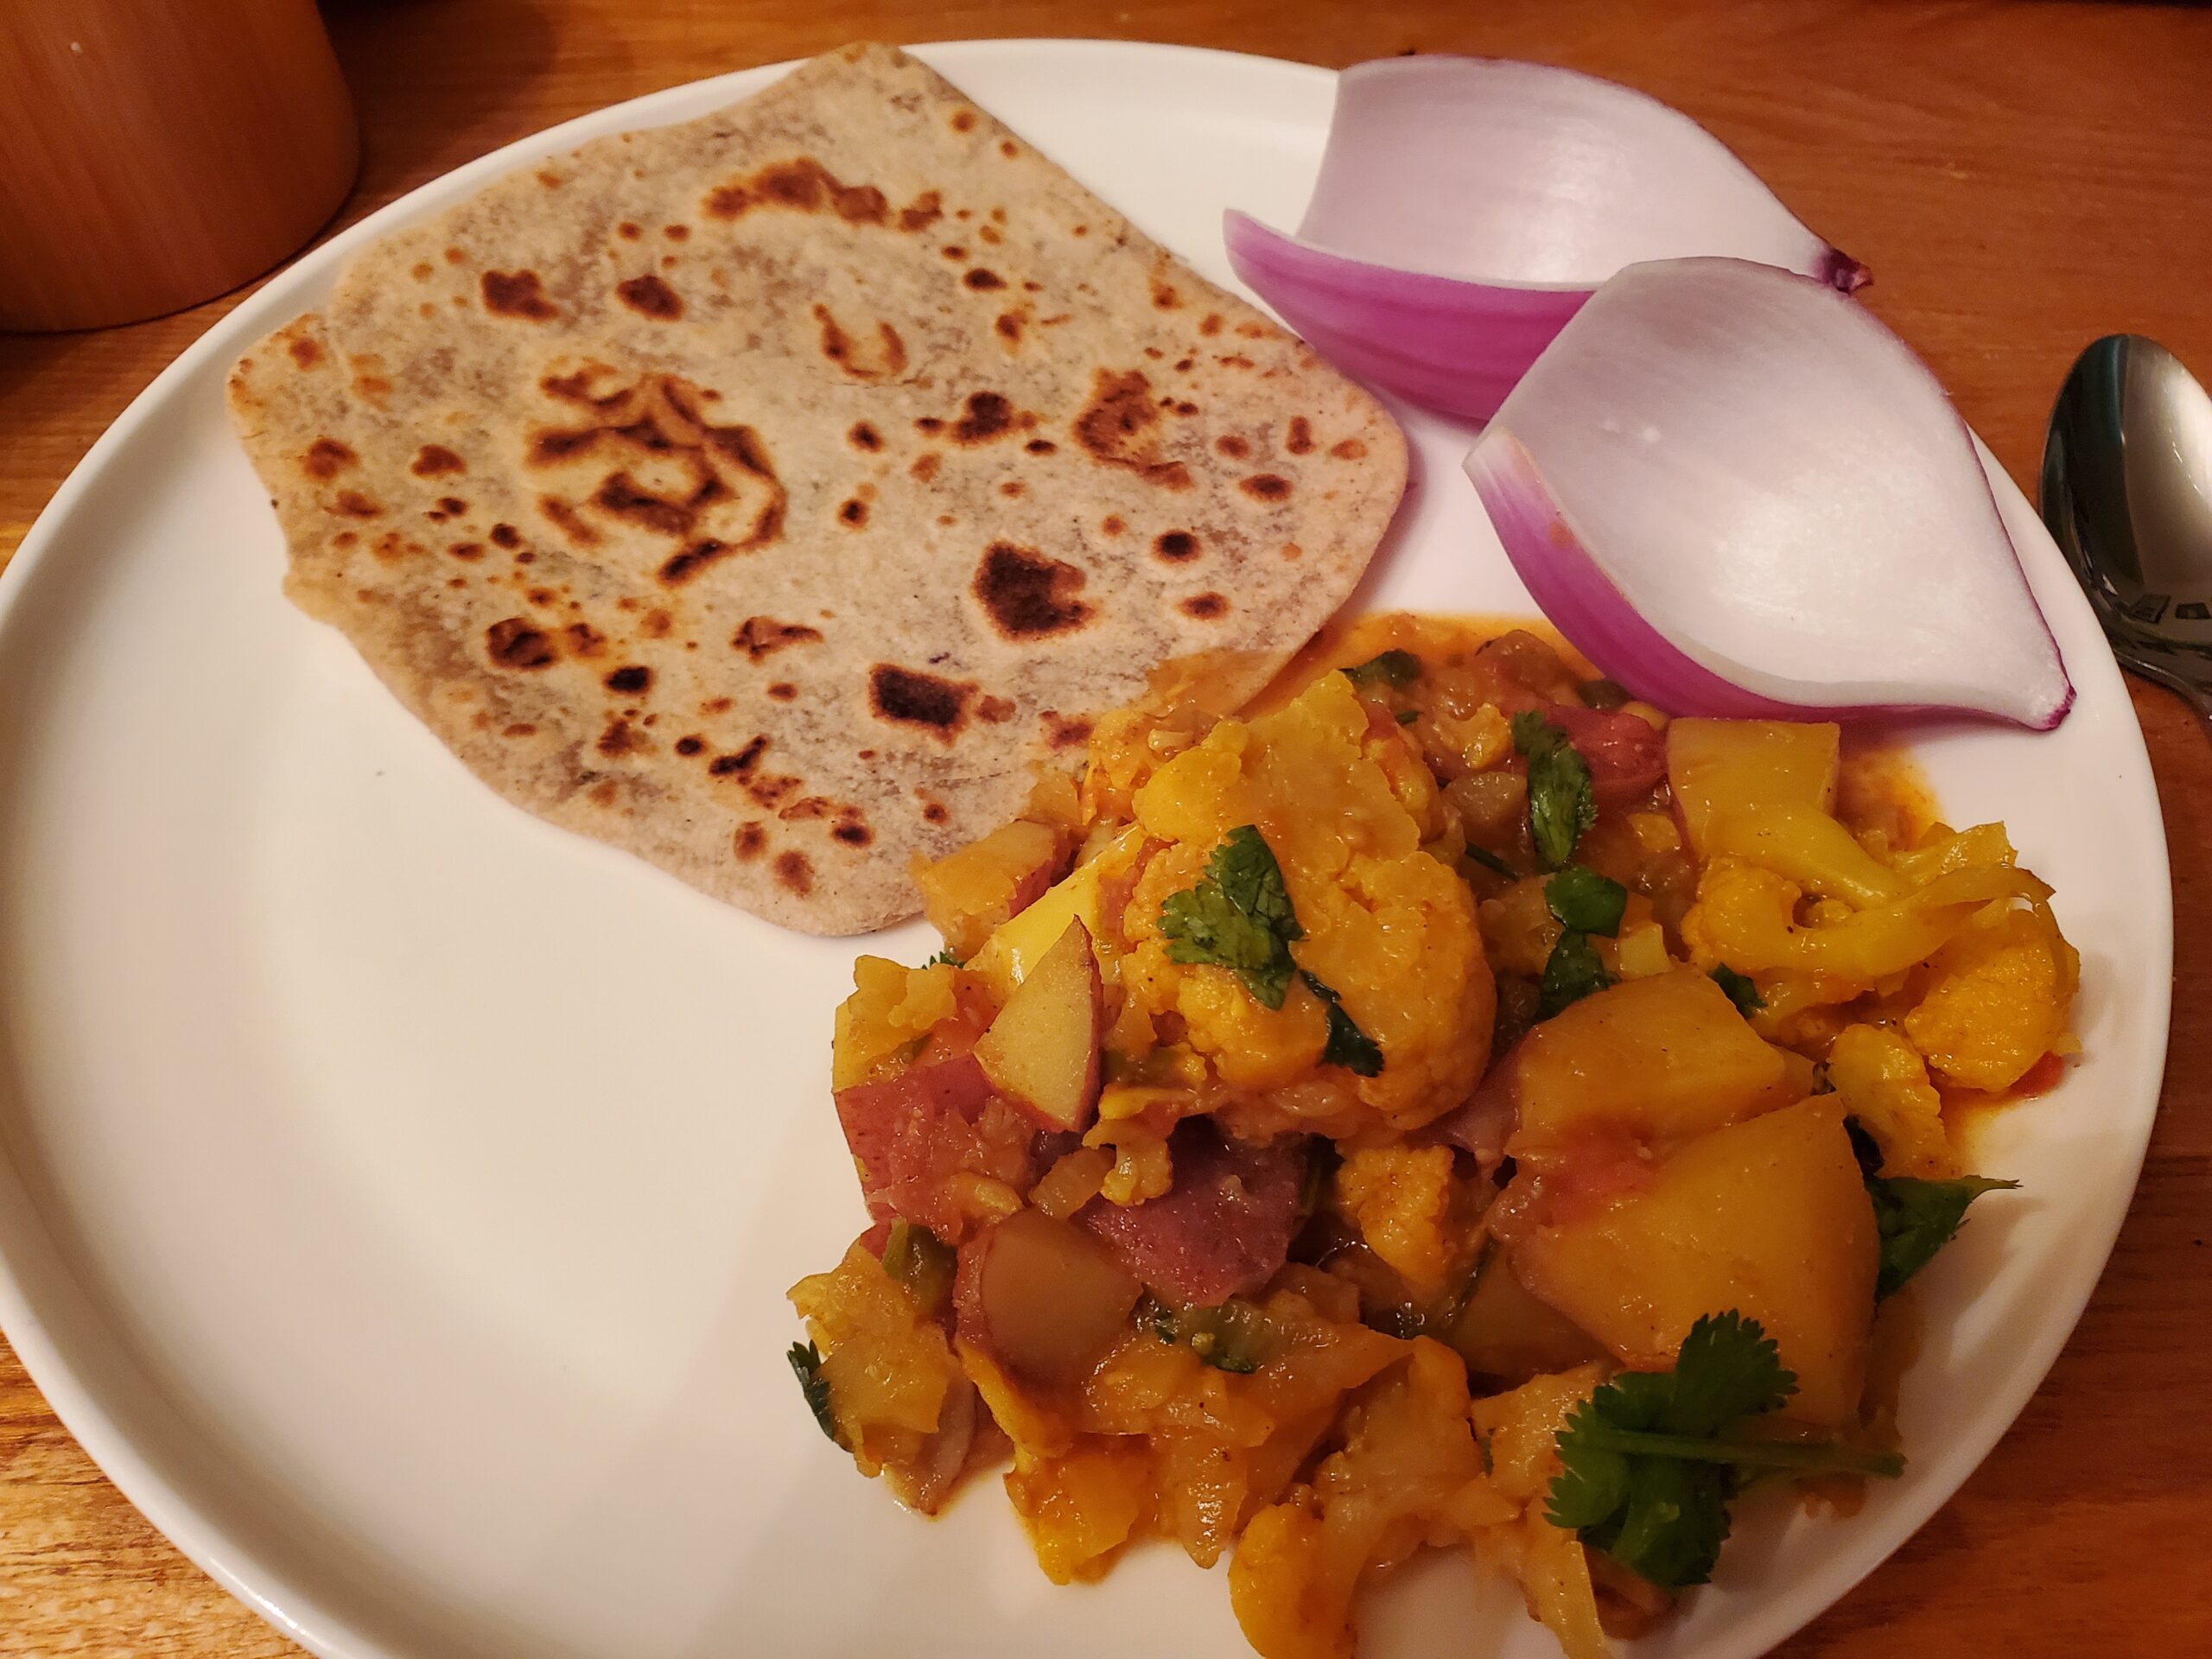
Print

Aloo Gobi

Ingredients

  • 2 tbsp oil
  • 1/2 white onion, chopped
  • 2 tbsp ginger/garlic paste
  • 1 tsp coriander seeds
  • 1 tsp cumin seeds
  • 1 tsp mustard seeds
  • 1/2 tsp haldi (turmeric)
  • chile powder to taste
  • 2 small thai chiles, finely chopped to taste, less is more, these tend to be HOT
  • 1 large tomato, medium diced
  • 1 large cauliflower, separated
  • 3 potatoes, large dice
  • salt to taste

Instructions

  • Heat the oil in a large pot. When it's hot, add the onion, cooking until translucent.
  • When the onions are cooked, fry the ginger garlic paste until it no longer smells raw.
  • Add the whole spices, stirring in the oil and ginger garlic paste until they start to pop.
  • Stir in the dry spices. The mixture should be looking pretty dry right now, so be careful not to burn the spices.
  • Quickly cook the thai chiles. They will only take like 30 seconds because they are so small.
  • Add the potatoes, cauliflower, and tomatoes, making sure they are coated in the spice mixture.
  • Add a 1/2 a cup of water to the pot and quickly cover. Allow the vegetables to steam for 15 or 20 minutes or until soft. Taste for salt.
  • Serve with naan, roti, or paratha.

Spicy Pork Bulgogi that’s perfect for summer.

We’ve been working our way through what we have in the freezer, trying to stretch our grocery trips. It’s rough. I’m used to going grocery shopping once a week and getting whatever I want and need for whatever recipe I want to try. Now I’m trying to stretch everything two or even three weeks. We smoked a pork shoulder a couple weeks ago, and we had about half the shoulder left. I was going to make carne adovada (recipe forthcoming!), but at the last minute decided to make spicy pork bulgogi instead.

What IS bulgogi? (I assume some of you are asking). Well, it’s meat that has been marinated then grilled. According to the internet, it LITERALLY means fire meat. That’s easy enough right? I mean, it’s almost summer. You’re probably going to be grilling anyway. Why not give this a shot? You can use beef if you have that on hand instead of pork. If you don’t like spicy leave out the hot sauce and the peppers. I feel like it’s better with that kick, but you do you!

When I made it for us, I grilled some zucchini with it and it was awesome. That and cauliflower rice? Delicious. The next time I make it imma turn it into bánh mì, and oooh that will be even better! Don’t be like me though. I’ve been singing spicy pork bulgogi like this ever since.

Print

Spicy Pork Bulgogi

Equipment

  • A grill

Ingredients

  • 2 lb pork shoulder thinly sliced
  • 1/2 cup soy sauce
  • 2 tbsp garlic powder
  • 3 tbsp gochujang
  • 2 tbsp mirin
  • 2 tbsp sesame oil
  • 2 tbsp ginger powder
  • 2 tsp schezwan pepper ground fine. (You can also use chile flakes if that's what you have.)
  • 1/4 cup kimchi hot sauce

Instructions

  • Mix all ingredients in bowl. Toss pork in the marinade.
  • Allow pork to marinate a minimum of 1 hour. More is better, but if you're short on time the hour is still really good!
  • Heat your grill to 400F.
  • When the meat is done, remove from marinade and grill, giving the meat time to start to char on the edges. Take your time with this. Bring a book out with you. It will cook pretty quickly because of the thinness of the meat, but you want those edges.
  • Serve with veggies or rice.

Notes

Don’t waste the leftover marinade! I used in the cauliflower rice for an extra zing!

The world’s fudgiest brownies

Does it sound like I’m throwing down the gauntlet? Maybe I am. I am claiming to have knowledge of the world’s fudgiest brownies. I dare ANYONE to find fudgier (please do and send me the recipe! Unless it’s a family secret, some things are made to be shared!).

My husband doesn’t like things that are too doughy. You will discover most of his food dislikes begin with the word too. He loves these brownies because they come out of the oven gooey and they stay that way. How, you ask? They only have 1/2 a cup of flour. (Record Scratch)

I KNOW. I couldn’t believe it worked either! And they were GOOD! They are one-bowl. The biggest bonus is they only take 30 minutes to bake. Which makes them perfect for late-night chocolate needs. The recipe doubles beautifully, and you don’t need a mixer or a whisk. I usually just use my silicon spatula (you recognize who I got there?)

Print

Fudgy Brownies

Ingredients

  • 1 1/4 sticks unsalted butter
  • 1 1/4 cup granulated sugar
  • 3/4 cup cocoa powder
  • 1/2 tsp salt
  • 1/2 tsp vanilla extract
  • 2 lg eggs
  • 1/2 cup ap flour
  • 2 tsp expresso powder
  • chocolate chips and nuts optional and to taste

Instructions

  • Position rack in lower third of oven. Preheat to 325F.
  • Spray 8×8 pan with all-purpose spray
  • Combine butter, sugar, cocoa, and salt in a microwave-safe bowl. Microwave at 45 second intervals, stirring between each interval until the butter is melted.
  • Stir in vanilla and espresso powder.
  • Add the eggs on at a time, stirring after each.
  • Add the flour and mix to combine. Add nuts and chocolate if using.
  • Spread evenly in pan. Bake for 20-25 minutes (a toothpick won't come out clean if you try). Cool and serve.

Sourdough Waffles using Discard

When you have sourdough starter around the house, you end up with a ton of discard. While it may sound yucky, it can be the thing missing that will take (some) of your baked goods to the next level. It doesn’t work so great with a dutch baby FYI, but it still tasted really good.

And that’s all that matters right? The taste I mean. Your food doesn’t always have to look gorgeous to taste delicious. Who are you trying to impress? And sourdough is one of those things that doesn’t always look pretty. There is a ton of trial and error to baking bread. So why not use the discard and make things that are equally delicious and a million times easier?

Trust me, these waffles are EASY. Do you have discard? Do you have a waffle maker? Congrats, you are almost to delicious waffles. And you should really own a waffle maker. About 10 years ago I had a craving for fresh waffles. I went to the grocery store first thing in the morning and told myself if they had a waffle maker for less than $20 I’d buy it. And they did. And apparently, my waffle maker has since been discontinued. That doesn’t change the fact that fresh waffles are so much better than store-bought, and it’s an investment in breakfast.

Print

Sourdough Waffles Using Discard

Equipment

  • waffle maker

Ingredients

  • 4 oz sourdough discard
  • 1 tsp vanilla extract
  • 2 lg eggs
  • 1/2 tsp salt
  • 1 tbsp sugar
  • 1 cup ap flour
  • 1 tsp baking powder
  • milk to thin any milk, as much as you need to make the mixture pancake batter texture.

Instructions

  • Preheat your waffle iron per manufacturer's instructions.
  • Mix all ingredients together in a large bowl, adding the milk last so you don't water it down too much.
  • Pour mixture into a liquid measuring cup (makes dispensing the batter so much easier)
  • Pour in the waffle maker and cook until desired doneness. I like mine a little crunchy.
  • Top with maple syrup, whipped cream, caramel, or anything you like!

Goddess Bowl for when you’ve had enough meat

To my husband’s utter dismay, my goddess bowl starts life as my chole recipe. Let me explain. The chickpeas get soaked, then pressure cooked in tea and vegetable broth (or chicken broth if that’s what I have. Seriously, the kind of broth doesn’t matter. Just use broth).

My husband sees the chickpeas soaking, smells the tea and broth cooking, gets his mouth ready for chole… and then realizes that everything has taken a distinctly non-bhaji turn. Not that he’s ever upset, he’s just usually vaguely disappointed.

Until he takes a bite and remembers how good it is. Like, really good. The veggies are slightly charred, the chickpeas, if you can be patient, actually get a little crispy. And I realize I’m the most non-commital recipe maker ever, but you can literally spice the chickpeas with whatever you want. Make them taste Indian! Or Mexican! Or Thai! What spices do you have and like?

Same with the veggies. We usually do broccoli, because we tend to have tons of broccoli in the house. You like sweet potatoes? Roast em and throw them in. Red peppers? Onions? Brussels Sprouts? It’s a great way to use up some of those veggies that have been languishing in the fridge. That’s why it’s called a goddess bowl; you will feel like one for not wasting those aspirational veggies.

Print

Goddess Bowl

Ingredients

  • 1.5 cup dried chickpeas plus water for soaking
  • Vegetable broth to cover in a pressure cooker
  • Black tea in a bag (3 tsp for my husbands tea, 3 tea bags for mine)
  • 2 tbsp olive oil
  • 1 lb brussels sprouts, trimmed and halved or ANY veggies you like. The method remains the same, the cooking time will vary.
  • 2 tbsp coconut oil
  • 3 tsp rose harissa see above! Use the spices you have on hand and enjoy!
  • 2 tsp garlic powder
  • 1/2 cup tahini
  • 1/2 lime worth of juice
  • agave, maple or honey to taste
  • water to thin if needed

Instructions

  • Soak the chickpeas overnight, on the counter in a bowl of water. Make sure that the chickpeas are submerged. You can even let them soak all day, but if you soak them TOO long (like more than a couple of days) they will start to sprout. 
  • When the chickpeas are soft (can you cut them easily with a knife or your nail?) they are done soaking. Drain the water, put them in the pressure cooker with the black tea bags and cover with vegetable broth. DO NOT fill the pressure cooker with liquid, use just enough to cook the chickpeas. 
  • Put the pressure cooker on the stove, make sure the lid is locked, and turn the heat to medium high. After 6-8 whistles (this will be some trial and error, your pressure cooker is different than mine!) turn the heat off and let the steam release slowly. When the steam is done releasing, scoop out the chickpeas, and allow them to drain dry.  
  • Preheat the oven to 450F. Toss the veggies in olive oil and season with salt and pepper.
  • Roast the veggies until they are cooked and slightly charred (30 minutes for brussels sprouts and broccoli).
  • Heat the coconut oil in the skillet. Add the chickpeas, trying not to crowd them. You are trying to get them to brown and crisp a little.
  • Add the spices. Continue cooking, stirring occassionaly.
  • In a bowl, combine tahini, lime juice, and sweetener. You can also add some spice here if you like fire.
  • Pile everything into a bowl and enjoy!

Lentils and Broccoli; a love story

A plate of green lentils and green, charred broccoli sitting on a multicolored wood cutting board.
Don’t be afraid of the lentils. They are your friends.

I’m not exaggerating about lentils and broccoli being a love story. I had never eaten a lentil until I met my husband. At least, not knowingly. Growing up, sometimes rice would show up (yuck), sometimes oats (packets). We didn’t eat a ton of beans that I can remember. I do remember a lot of potatoes, but I digress. The vegetables we ate were typical; either canned or frozen, which are rarely the ideal states for delicious veggies. Suffice to say, unless we were having Mexican, it tended to be your typical American fare.

Then my husband happened. Or we happened to each other. At any rate, I got exposed to a ton of exotic to me foods. While I’ve never been a picky person, I hadn’t been exposed to a lot. It took me a long time to figure out that fresh vegetables, roasted, and cooked properly were delicious. And the lentil thing shouldn’t be a surprise to anyone; according to my one Google search on the subject, Americans only eat about two ounces of lentils a year.

The broccoli gets roasted until it’s starting to char, and the lentils get tempered. When you temper lentils, you pour cooked, mashed dal into hot oil that’s been used to bloom spices and garlic. In this case, I am using green lentils and not toor dal. I also do not mash my lentils; I like them to still have texture. Also, I really don’t like toor dal, so lentils and broccoli is almost a compromise.

Print

Lentils and Broccoli

Ingredients

  • 3 tsp coriander seeds slightly crushed
  • 3 tsp fennel seeds slightly crushed
  • 2 tsp cumin seeds slightly crushed
  • 1 thai chile or jalepeno diced
  • 4 cloves garlic diced
  • 3/4 cup olive oil
  • 2 cup green lentils rinsed well
  • 4 cup broth
  • 1 lb broccoli washed and segmented
  • dill, mint, parsley, cilantro whatever herbs you have on hand will work
  • sherry vinegar to taste

Instructions

  • Preheat oven to 450F.
  • Place the lentils in a saucepan with the broth and bring to a simmer. Cook for 25-30 until done and most of the broth is absorbed. Stir in the vinegar and herbs, allowing the heat of the lentils to wilt them.
  • When the lentils are almost done, toss the broccoli with enough oil to coat, salt, and pepper. Roast for 10-12 minutes, or until they are starting to char but are still crunchy (or cook them until soft if that's what you prefer.)
  • In another saucepan, warm the oil over medium-low. Add the spices, chile, and garlic, swirling and cooking until everything is fragrant. Pour over hot oil the lentils in the other pot, stirring to combine.
  • Taste for salt. Serve with broccoli.

Overnight Oats are the easiest oats ever. Fight me.

I have a confession to make. Contrary to what must now be popular belief, see my previous oatmeal post, I don’t like oats that much. At least I didn’t when I was a child. Oatmeal came from a packet, was always microwaved, and it tended to be brown sugar-flavored. Blech. It was weirdly sweet, and always gooey and gloppy in the worst way. Enter: overnight oats.

What could be easier than mixing some stuff together in a container and sticking in the fridge overnight? The answer is nothing. Nothing is easier. It’s especially nice when you know you’ll be hyper-busy in the morning because you can throw it in your bag and go. It’s so easy it’s not really a recipe. More of a…suggestion? I am very partial to Talenti containers or old salsa jars (don’t at me), but anything will work. Tupperware? Mason jars? Whatever you use, I recommend a wide mouth because the wider the mouth the more toppings you can fit.

These overnight oats are orange-flavored because I am on an orange kick right now. I’m sure when it finally gets warmer it will be peach or (in my dreams) watermelon. I also have some orange coffee sugar, which, TBH isn’t awesome in coffee. It is awesome in these oats.

Orange overnight oats with chia seeds in a Talenti jr, topped with mandarin orange segments.
See? Absolutely not kidding about the Talenti jar.
Print

Orange Overnight Oats

Ingredients

  • 1.5 cups old fashioned oats
  • Enough milk to cover. This will depend on your container. I used almond milk, but any kind will do.
  • 1 tbsp chia seeds
  • 1 tbsp honey or flavored sugar
  • 1 tsp vanilla extract
  • 1/4 tsp orange extract Or less even. You just need the smallest amount.
  • 1 serving probiotic powder optional
  • 1 tsp pink salt or regular salt

Instructions

  • Add all ingredients to a jar and stir, ensuring everything is incorporated and soaking.
  • Refridgerate overnight. Top with orange slices.

Collard Greens are a delicious excuse to eat more meat.

Collard greens are just an excuse to eat meat with your meat. THERE I SAID IT. I am very brave, give me my medal.

All jokes aside, if you cook collard greens long enough they get buttery soft and the meat falls off the bone. And the pot liquor is so luscious, you’ll want to sop it all up with something (maybe biscuits?).

It doesn’t matter if you buy bagged greens or buy them in bunches, you’ll want to wash them. Greens of any kind can be very gritty, and crunching on sand during dinner is the WORST. Even if the bag says the greens have been washed do not trust them. They lie. Or they simply do not do a very good job. If you do it yourself you will know it was done right.

I know the apple cider vinegar seems like a weird addition, but trust me, it adds that slight hint of acid you need with the smokey pork flavor. You can, of course, leave the pork out. It won’t be quite as delicious, but it will still be really really good.

Bowl filled with cooked collard greens and smoked pork.
Print

Collard Greens with Ham Hock

Ingredients

  • 2 large bags collard greens by all means use the whole bunches. Get about 5 of them, wash them really well, tear the leaves off the steams, then cut the leaves into bite-size pieces.
  • 2 tbsp olive oil
  • 1 whole onion finely chopped
  • 5 cloves garlic minced
  • 4 cups chicken stock
  • 2 cups water
  • 1/4 cup apple cider vinegar
  • 1/4 cup dark brown sugar
  • black pepper and red pepper to taste
  • 1 smoked ham hock a hambone from a spiral ham will work too, it just won't have the same flavor as as much meat

Instructions

  • In a large stockpot, heat the olive oil over medium heat.
  • Cook the onion until starting to brown, then add the garlic and (optional) chile flakes. Cook them until fragrant.
  • Add the stock, water, vinegar, and brown sugar. Taste for heat and salt, then bring to a boil.
  • Reduce the heat to a simmer and wilt the greens in the liquid. They will reduce down.
  • If you don't have a crockpot, you can continue simmering the greens on the stove until the greens are cooked, about 5 hours or so, adding in the smoked ham hock before you really start cooking.
  • If you do have a crockpot, transfer everything from the stockpot to the crockpot, adding the smoked ham hock before starting the cooker.
  • Cook on low for 8-10 hours, or high for half the time.

Serve  with chicken, biscuits or beer bread, or whatever you want! It’s a great side for a cookout or anything fried.

Sausage Gravy (to go with them biscuits!)

Remember in the biscuit post I talked about my love for sausage gravy? No? Go read that recipe and then come back to this one. I’ll wait.

Done? Good. Hopefully, you went ahead and made the biscuits while you were over there and are now dying for something delicious to smother them with. Well, you are in luck!

Sausage gravy in a non-stick skillet with a wooden spoon propped against it.
Behold. Delicious.

Not one for the faint of heart ( or high of cholesterol), this sausage gravy has everything. Spicy and creamy and umami, it hits all the notes. Pair it with those biscuits (or pasta as my husband suggested this morning; if you do that let me know how it went!)

A plate of biscuits smothered with sausage gravy.

I don’t believe you would have to make this with pork sausage. You could probably use turkey or even chicken. My concern is always the fat content. Both of those meats have significantly less fat than pork does. If you do decide against the hog, I would recommend using some oil to brown the sausage. I don’t use oil initially with the pork sausage because it creates its own oil, adding the butter later helps the flour along in cooking. I would use dairy milk for this recipe. A lot of recipes can handle a substitute, but again, I don’t know that the fat content would be high enough with say, oat milk versus whole milk. If I am wrong please let me know! I would love to hear your opinion.

Print

Sausage Gravy

Ingredients

  • 1/2 lb breakfast sausage, ground pork is ideal, do not use the links unless prepared to open them up.
  • 1 tsp red chili flakes or to taste
  • 2 tbsp unsalted butter
  • 1/4 cup ap flour
  • 1 cup milk
  • 2 tsp garlic powder
  • pepper and salt to taste

Instructions

  • In a non-stick skillet (or cast iron) over medium high heat, brown the sausage.
  • When the sausage is brown and cooked through, add in the chile flakes. Cook for about 30 seconds or until they start to get fragrant.
  • Melt the butter in the pan, stirring to coat the meat.
  • Reduce heat to medium
  • Sprinkle the flour over the meat. Cook, stirring until the meat is coated and the flour doesn't smell raw anymore.
  • Add in milk and garlic powder. Allow the milk to thicken (if too thick for your liking add more milk.)
  • Finish with salt and pepper to taste. I like grinding my own pepper so I can get those big chunks. Serve with biscuits (or pasta if you're brave!)

Homemade Biscuits are nothing to be scared of.

I love homemade biscuits. And when you add sausage gravy? Like, love it love it. It’s a great breakfast to make on the weekends, where you arguably have plenty of time to get it done. Don’t get me wrong, canned biscuits work too, but there is something about making your own from scratch.

Y’all, I lived in the south for (mumble mumble) years. It should not be that hard for me to make biscuits, but for some reason, they would always taste good, but come out flat. No lift. I couldn’t figure out what I was doing wrong. Then I realized. I was rolling them too thin! Those little jerks never stood a chance! Now I shape the dough and pat it (not roll) into a square about an inch or so thick.

When you do it this way, the biscuits rise to the heavens, and sometimes they even topple over. My point is, do not fear the homemade biscuits! They are nowhere near as hard as you think, and they are just so delicious. And seriously y’all, if you take any advice from me ever, buy a dough whisk. It will make your baking life so much easier. Enjoy the biscuits with sausage gravy, thick-sliced ham, or just in place of rolls.

The biscuit glamour shot. Three nice looking biscuits (high and tight), one that is distinctly, different. Leaning all the way to the left.
The less glamorous biscuits. Still pretty, but you can see just how many decided to flop over on me.
Print

Homemade Biscuits

Equipment

  • sheet pan
  • parchment paper or a silicon mat
  • dough whisk

Ingredients

  • 2 cups ap flour plus more for dusting
  • 1 tbsp baking powder
  • 1/2 tbsp granulated sugar
  • 1 tsp kosher salt
  • 1 stick unsalted butter frozen
  • 1 cup milk buttermilk is ideal, but use regualr milk if that's what you have
  • 2 tbsp dried herbs I like Trader Joe's 21 Seasoning Salute, but anything works

Instructions

  • Preheat oven to 425F. Line your sheet pan and set aside.
  • Sift together flour, baking powder, sugar, and salt.
  • Cut the butter into cubes, or use a box grater to shred the butter into the flour mixture. Work it in, being careful not to melt the butter.
  • Add the milk and the herbs, mixing it to incorporate everything. The dough will be sticky at this point.
  • Transfer the dough from the bowl to a floured surface. Work the dough, adding more flour until it's not sticky and it holds together.
  • Fold and flatten the dough as many times as you feel. This is called lamination, it will help with the flaky layers!
  • Flatten the dough enough to cut, about an inch but not so flat that it won't rise. Give it a helping hand.
  • Using a round cutter (or mason jar lid! Stemless wine glass!) cut the dough into circles. You can also go rogue and cut the dough into squares with a knife. You may have to reincorporate the dough a couple times so you can keep cutting. You should end up with about 6 biscuits.
  • Place the cut biscuits on the sheet pan about an inch apart. Bake for 12-15 minutes, or until the tops are golden. Brush with melted honey butter if you feel like it.
« Older posts

© 2024 Sabudanahunter

Theme by Anders NorenUp ↑